Overworld Graphics Redux: Vegetation

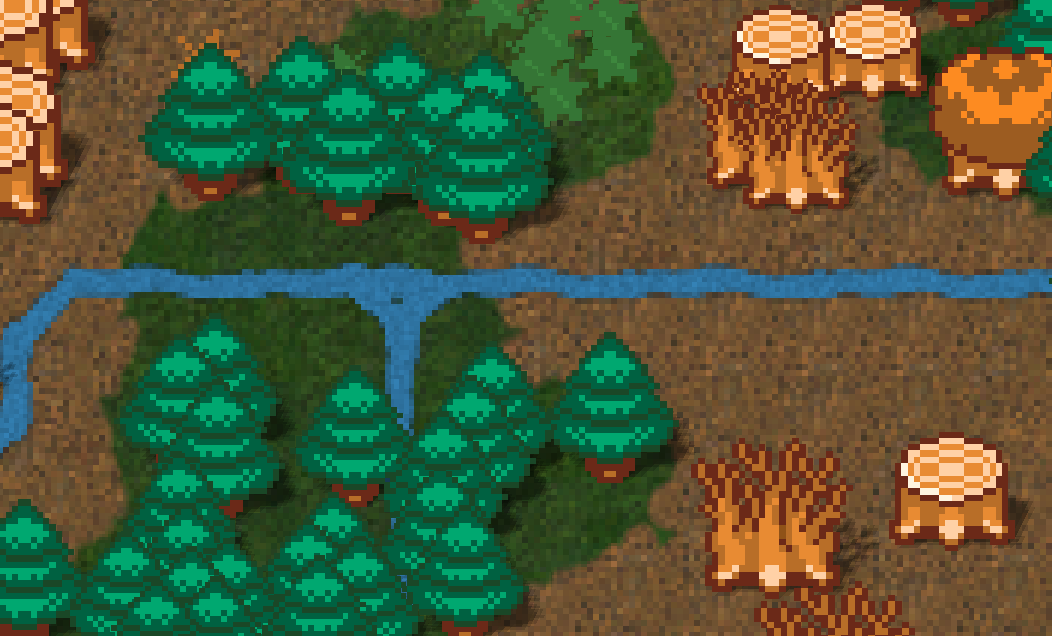
Before I start rambling on details, just a little bit of motivation on why should the overworld graphics need to be worked on. For reference, here's how it looked a few months earlier:
So far I've been using HoMM 3 assets as a temporary placeholder solution, and of course this would need to change, as it's fine for a tech demo, but not for anything publishable. I love HoMM 3's artstyle, and if at some point my game is nearer completion and I got the budget, I'll hire an artist and point my finger at HoMM 3, pleading for more of the same, but different. But here we are now, and we'll make do with the fantastic 16-bit tiles from Oryx.
Tiling
Many 2D games (such as HoMM 3) use a 2D grid for placing things such as walls, floors, objects, trees, creatures, etc. Techniques such as autotiling, in addition to well-designed art, can hide the nature of the grid. HoMM 3 is again a really good example of this:
Another very good animated example is from Warcraft II:

So, to maximally utilise this trick, we need good art. To render this on screen is very very cheap: For a single layer, a single tile is assigned per grid cell. Combining multiple layers and transitioning between tilesets can be a more challenging task.
Requirements
In the game, the overworld is a grid, where each cell stores details about the contained biome, for example temperature/humidity/altitude, if it's a river, if it's sea or a lake, if it's a hill or a mountain, etc.
The art requirements for the overworld are as roughly follows:
- Tiles and variations for backgrounds of each biome
A way to do transitions between biomes[using transition masks]- A way to depict varying vegetation per biome [this post]
- A way to depict hills and mountains
- A way to depict decorative props in each biome (e.g. skulls in the desert) [should be very similar to vegetation]
In the above, [1] is currently using HoMM assets, but it's very simple to replace, and will do shortly with Oryx tiles to begin with. This post will focus on vegetation.
For enough variation for all biomes, a lot of art is needed. Add to that the autotiling art requirements, and that becomes quite a big task. So, what do we do? As usual, let the computer do the hard work.
Vegetation Distribution using Instancing + Poisson Disk Sampling
Instead of carefully designing tilesets, a different approach is to just use basic art elements (a single tree, a single bush, etc) and distribute them nicely. We do not have to be restricted by the grid anymore: e.g. a tree can be placed anywhere in the continuous 2D space. As one might imagine, for a large overworld, we will need a lot of trees. In this case, as it turned out, half a million of them. The best way to render multiple objects of the same type is using instancing. Any reasonable game/graphics engine or API should provide such functionality.
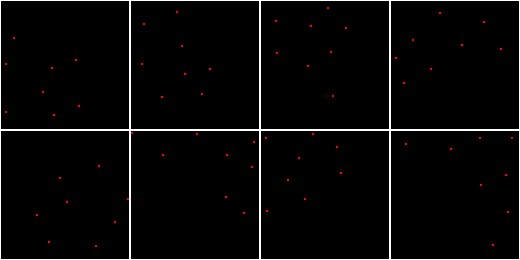
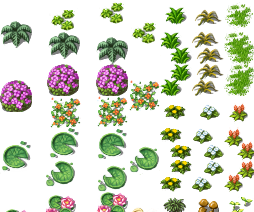
A standard way to distribute vegetation is Poisson Disk Sampling, as it has some desirable characteristics, most importantly a minimum distance between each pair of elements. We can use this to generate positions of vegetation elements within a single tile. For example, a dense forest tile could contain 8 trees, whereas a desert might contain a single cactus element. Therefore, we can pre-generate multiple variations of poisson sample sets for the most dense scenario (8 elements per tile) and use those for calculating the position of each vegetation element. Here is how a pre-generated sample set looks like (8 variations):
So, how do we generate the positions for all trees? Here's some pseudocode:
// 64 variations of 8 positions within the unit square
vec2 poisson_sample_sets[64][8] = ...
for each grid cell on the map:
	// select a random set
	rand0 = hash( cell_coordinate )
	pset = poisson_sample_sets[ rand0 % 64]
	N = calculate number of vegetation elements for cell
	// create a random starting element for this sample set
	i0 = hash( cell_coordinate + 123 ) % N
	for each i in N:
		sample = pset[(i0 + i)%N]
So, we need to randomize a lot, but also be consistent: e.g. the elements for each tile must all use the same sample set. Also, if 2 tiles use the same sample set and need to place 4 out of 8 trees, by starting at different positions in the sample set guarantees greater variety.
A simple way to utilize this, is to pre-generate the positions of each tree and simply render those using instancing. For actual numbers, I'll use the real numbers that I have for a standard overworld map:
- 28911 tiles, 1 tree per tile (sparse vegetation: deserts, tundra, etc)
- 31563 tiles, 2 trees per tile (total: 63126 instances)
- 40686 tiles, 4 trees per tile (total: 162744 instances)
- 37952 tiles, 8 trees per tile (total: 303616 instances, dense vegetation: jungle, swamp, etc)
So the above is about 550,000 instances. The memory requirements using 16 bits for each coordinate (it's enough) will be 2.2MB, so not bad! We just have to figure out in the shader:
- which tile we're on =>
- what biome we're on =>
- what trees are ok to use for this biome =>
- pick a tree!
- [bonus] scale the tree randomly between 90%-110%
Rendering the instances should be blazing fast, and if it's not, you can use linear quadtrees with morton order, which will definitely make it blazing fast (I've been using this for neuroscience data, 2 orders of magnitude greater in number). Actually, I should implement that next, as when the lockdown is over, I might develop more on the laptop.
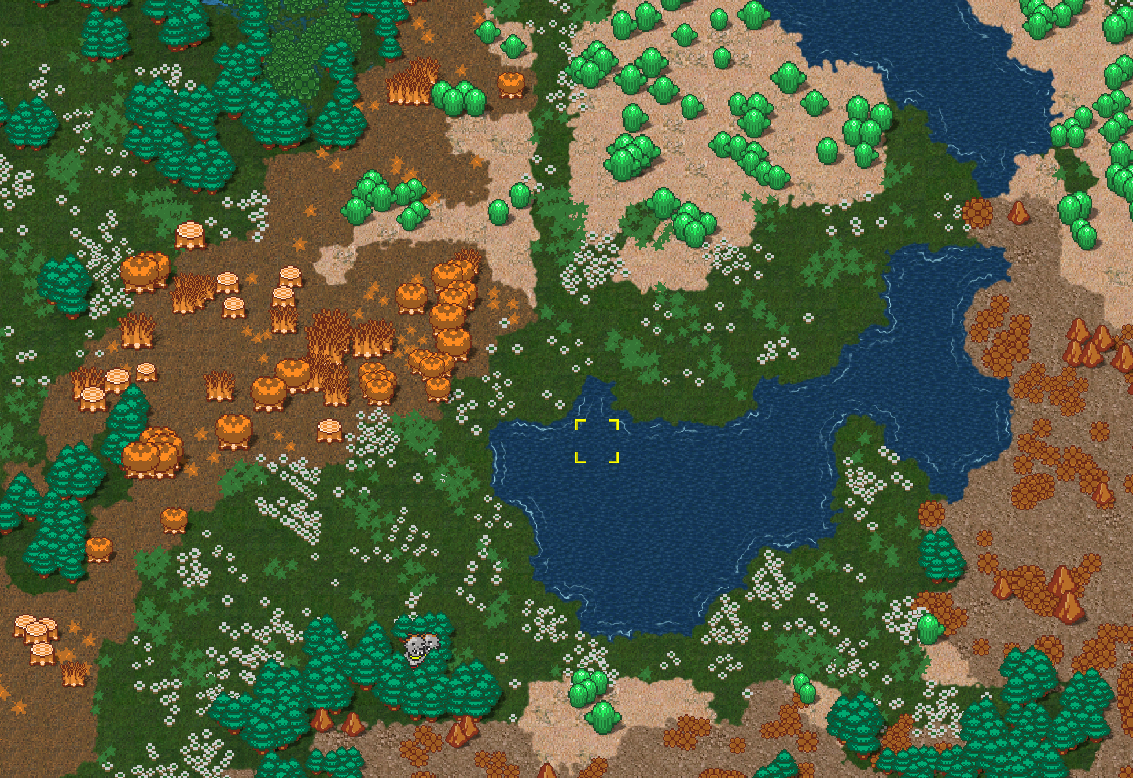
So, how does the distribution look like more practically? Here are a few screenshots using different number of available poisson sample sets:
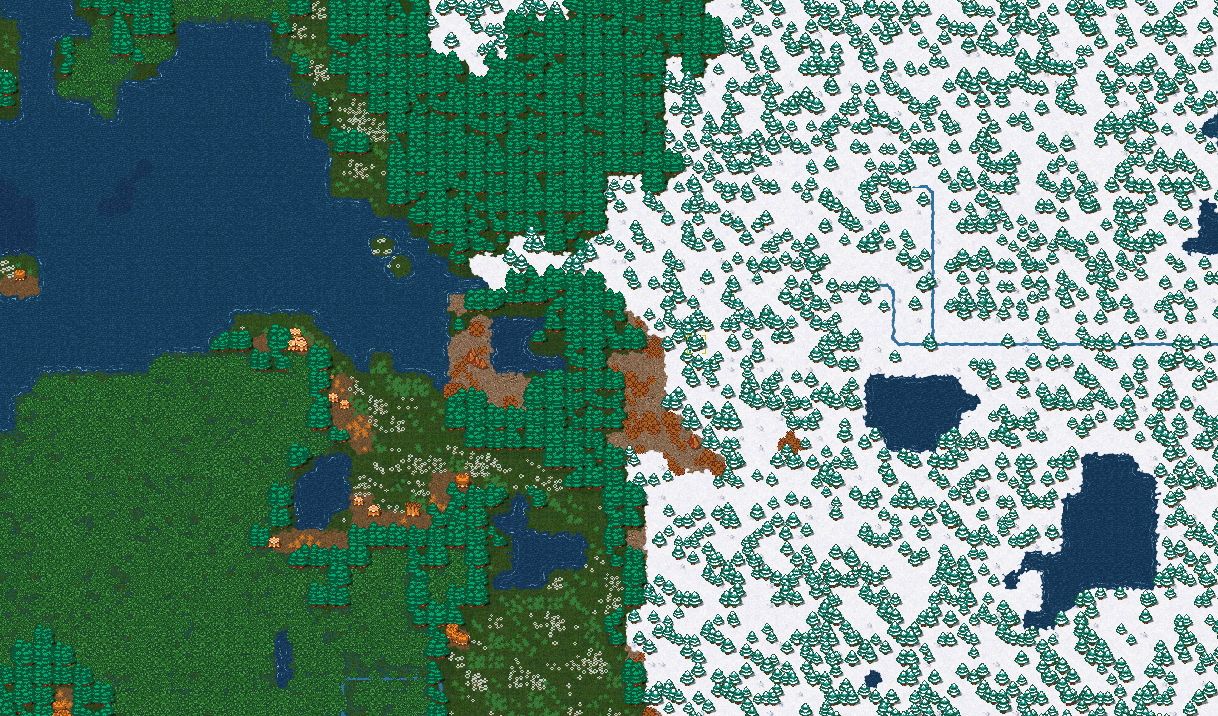
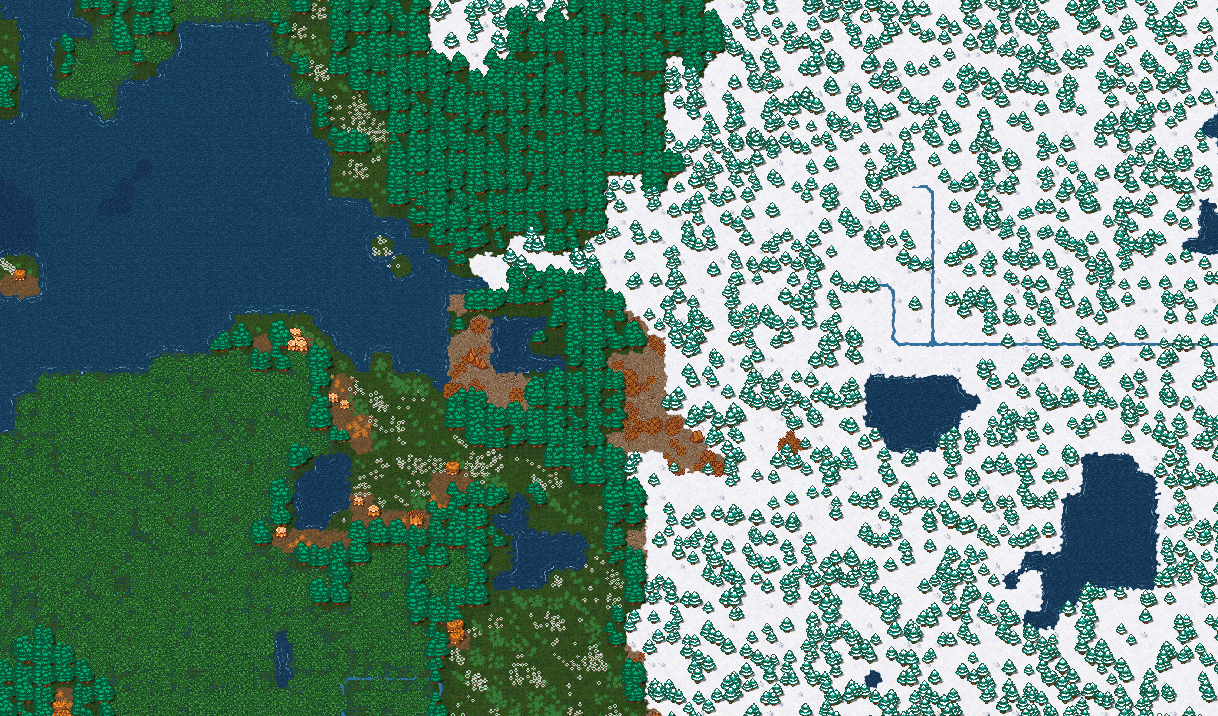

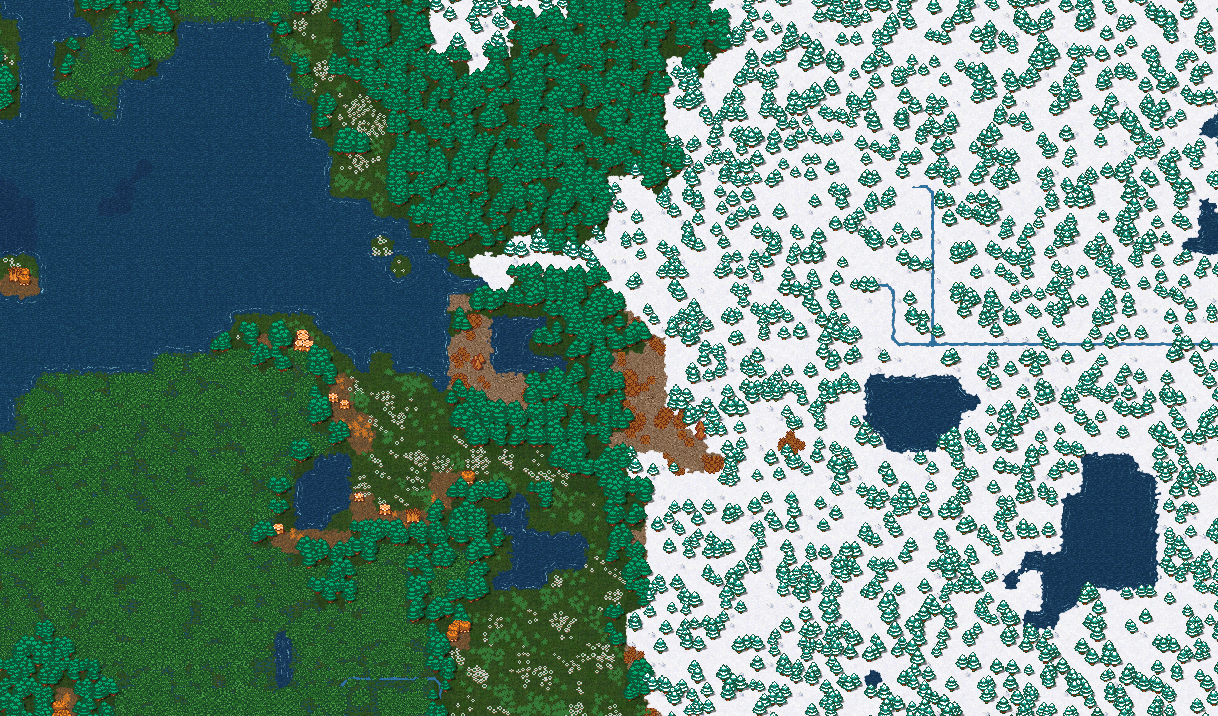
Note: Care needs to be taken so that samples do not end up in rivers or at sea. I do that by checking the tile and neighbours. I split the unit-space in a 3x3 subgrid, calculate "isGround" values for each subtile based on biome data, and discard samples that fall into a subtile that is not set as ground.
Z-layers: Decals vs Billboards
The previous images use a trick to handle the overlaps correctly. Well ok, it's not really a trick, it's standard Z-buffer, we just need to be careful with the coordinates of our rendered quads.
Sprites such as trees are also called "billboards" in 3D graphics: they look like they are facing the viewer. The sprites typically look like a picture taken in front of the tree: the bottom part is the trunk, and the top is the canopy. Therefore we can say that the Y axis roughly corresponds to height. Here are some examples:
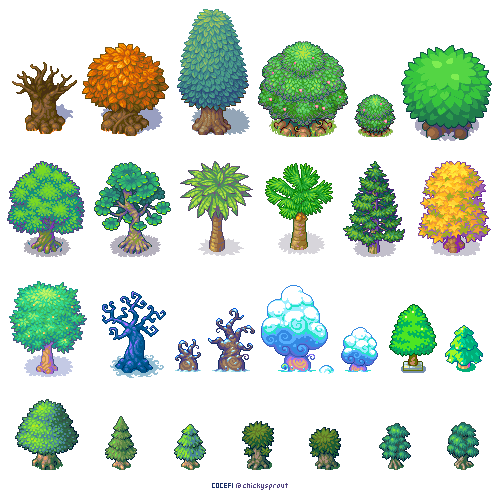
Some other sprites, such as flowers or bushes, look as viewed from above, rather than from the front (as was with trees). In this case, the image Y axis does not correspond to height anymore, but corresponds to depth instead. Let's call these "decals", as they are like stickers over the terrain. Several shown below:
These two have a fundamentally different behaviour in a two related aspects: depth perception and shadows.
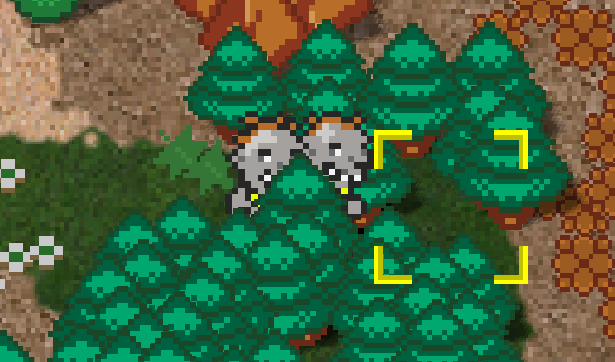
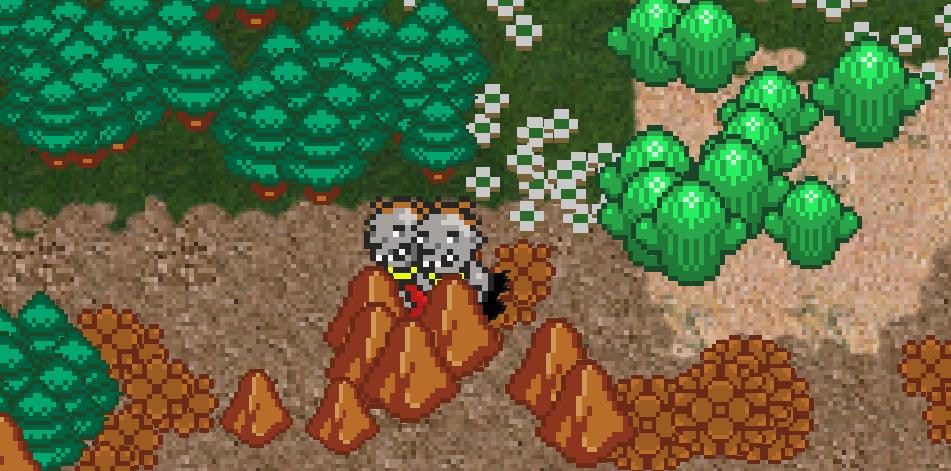
Decals don't really have depth, as they are like stickers: nothing is "behind" them, as only the background is under them. Trees on the other hand have depth. Things can be behind trees. Here's an in-game example of the Toothy Troll hiding behind some conifer trees, and in front of some other trees
whereas flowers are not a good place to hide:

In order to achieve this depth effect, we need to manipulate the depth of the rendered quad vertices. But first, a bit about the camera used: it's an orthographic camera from an overhead view, so Z is camera depth, which also represents the world's height. Therefore, the background is always at Z=0.
When we're rendering sprites, such as the troll or the trees, the bottom part touches the ground (Z=0) while the top part has some height (e.g. Z=1). By doing just this, we've ensured correct rendering. Below is an example of 3 trees rendered like this, in 3 subsequent grid cells (side view):
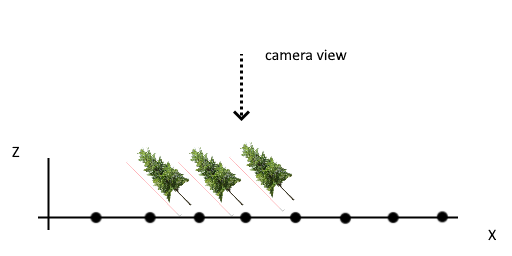
You can see that the camera ray might not reach the trunk of the middle tree as it might be obscured by the canopy of the right tree. So, because of the need for depth, we need to use alpha masking instead of blending.
The information about what's billboard or decal can be encoded along with other per-sprite data, and just needs a single bool flag (or 1 bit).
Billboard Shadows
Billboards, because they encode height, can typically cast shadows. We'd expect trees and creatures to cast shadows, but not necessarily flowers and bushes (decals). The easiest way to cast shadows is to render an additional pass with all instances, with a couple of changes:
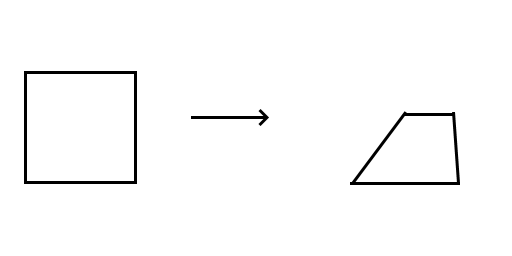
- Adjust the quad geometry so that it's sheared
- Use black/grey instead of colour
Here's a quad and it's "shadow" transformation: it fakes a light source from the top left (=> right shearing) that casts a perspective shadow (diminuition effect)
Below: with and without the shadows:

I think it's much better with shadows! And they come for free really, development-wise.
To simulate soft shadows, we can use a distance field, that records distance to the silhouette of the sprite, from inside the sprite. I maintain such distance fields for all sprites as they are useful in more cases, but here we can map distance to shadow strength via a smooth curve.
Pixelated river flow
Finally, I've added some pixelated mild noise on rivers, to have some animation but without using any flow direction. Here's an image, but this is better seen in a video